Movicon Help on Line - Rel. 11.7.1302
To insert an Alarm into the project, you need to start this procedure by inserting a new object into the 'Alarms List' group in the 'Project Explorer' window. To do this you can either right mouse click on the 'Alarms List' group in the 'Project Explorer' window and select the 'New Alarm' command, or use the same command also found in the Project Explorer's 'Commands' window.
When confirming this operation, the new alarm will appear in the group or in the point selected in the project's structure. At this point you can go on and carry out the Alarm property settings as described in the documents on "Alarm Properties".
Afterwards the Alarm object can be assigned a Name by clicking on the resource and entering the name replacing the one for default, or after having selected the object, press the F2 key and carry out inserting the new name procedure.
New Alarms can be entered by copying the data from the resource, from the same or other projects. In order to do this, select the alarm or the alarms you wish to copy, then use the Copy/Paste function from the Edit menu (or with the equivalent keyboard keys, tool bar or right mouse key techniques).
To delete one or more alarms from the project first select them then activate the 'CANC' key or 'DELETE' key from the keyboard.
The setting or editing of alarms is done through the Movicon 'Properties Window'.
Each entered alarm must then be associated with one or more intervention thresholds To add an intervention threshold to an alarm, first select the alarm then right mouse click and select the 'New Alarm Threshold' command, or use the same command which can also be found in the Project Explorer's 'Commands' window. When confirming this operation, the new threshold will appear in the Alarm's structure. At this point you can proceed with setting the threshold's properties as described in the document about "Alarm Properties".
Messages
The only difference between alarms and messages are the "Support ACK" and "Support RESET" ' property settings of the alarm threshold. If these two properties are both disabled, the alarm will not need acknowledging and resetting by the user and therefore will only be displayed according to the status of the associated variable, thus making it a simple display message.
In the Project's Explorer Window 'Alarms List' the image displayed for the alarm thresholds will differ according to whether they have been configured as alarms or as messages. During runtime the image shown in the Alarms Window, next to the text, will also differ according to whether an alarm or message is being dealt with. This function is valid for local alarms only. Different icons, to represent whether an alarm or message, are not supported for alarms and messages displayed by Client projects. In addtion to this, "MESSAGE ON" and "MESSAGE OFF " instead of "ALARM ON" and "ALARM OFF" texts will display as the event identifier in the "Historical Log Window". Therefore the MESSAGE ON" and "MESSAGE OFF " events can be filtered in the Historical Log's message filter window.
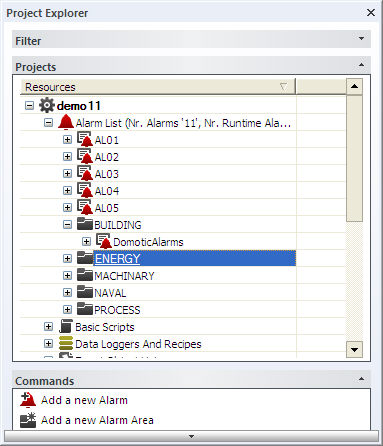
The alarms can be grouped in different areas so that they can be displayed in the "Alarm Window" window based on their on the area they belong to. This may be helpful to enable you to divide the alarms according to the different plant zones they come from. The are two methods to use for associating an alarm to a certain area:
insert the name of the area in the "Area" property in the "Alarm Threshold General Properties". This will associated the Area name to the alarm threshold.
create Areas in the "Alarm List" resource by using the "Add new Alarm Area..." command. This command allows you to add folders to the "Alarm List" resource. Each folder represents an area, and all the alarms which are moved to this folder will then belong to that specified area. The name of the Area will also be associated to the alarm object.
|
|
Warning! When both of the above listed methods are applied to the same alarm, priority will be given to the Area set in the "Alarm Threshold General Settings". |
Create "implicit" alarm areas using a Variable Group: if the alarm is associated as a Template to a Variable Group, the name of this Variable Group can be used as the Alarm Area name. This method is very handy when needing to create nested alarm areas. A sub-group of variables is a sub-area in a way that the name of the area by identified by the linking of Variable Group names separated by the "." char. For instance, if the "Group01" variable group contains the "Group02" sub-group, the Alarm Area of Alarm Templates can be distinguished by then being called "Group01.Group02".
|
|
Areas created as Folders or as Alarm threshold properties are XML Attributes of the Alarm object or threshold, and are not File System folders. |
The create Alarm Area can be deleted from the Alarm resource by selecting it then pressing the keyboard "Canc" key. However in order to cancel an Alarm Area, it must not contain any alarm objects. Alarm Areas can also be deleted by simply moving or deleting the alarms contained within until it is completely empty. The Alarm Area will then become non-existent when the project is saved, closed and then re-opened afterwards.
Importing Alarms from other Projects
Movicon allows you to copy one or more Alarms from one project to another. To do this, both projects must first be opened, then the Alarms selected and copied using the Copy command from the 'Project Explorer' window of the source project. Then position mouse pointer in 'Project Explorer' window of the destination project and execute the Paste command. The copied Alarms should then also be available in the destination project.
The Drag & Drop techniques can also be used with the following procedure: select the Alarms from the source project and keep the left mouse key pressed and drag them to the point desired in the destination project, then release the mouse key.
Enabling Alarms
The Movicon Alarms predisposed with a useful enabling property, to allow the programmer to temporary deactivate the working of each single alarm.
This setting can be done by accessing the "Enable" item through the 'Alarms General Properties' of the Alarms' 'Properties Window'.
Alarm groups or the all the contents of the Alarms Editor can also be enabled or disabled at the same time. In this case simply select all the alarms required from the 'Alarms List' and set the "Enable" property from the 'Alarms General Properties'. In this way the setting will be propagated to all the alarms selected.