Project Explorer Window
All of the Project's Resources
are grouped in the 'Project Explorer'
window. This is the main window of the Movicon Workspace and it allows
you to display all the information related to the resources which are
the essence of the project itself.
The 'Project Explorer' window gathers all the Resource Groups into a
tree structure. When selecting an individual Resource Group or any sub-group
component, their related properties will activate in the "Properties
Window", through which you can make the various changes
to settings.
The "Project Explorer"
can be activated with the 'Project Explorer' command from the 'View' menu.

|
You can use the "+" key from
the number keypad to expand or collapse a node from the project's
tree structure list, displayed in the Project Explorer window.
This
key functions independently with or without the Numlock, but the
standard keyboard "+" key does not have this function.
When
the selected node shows with a + sign next to it, pressing the
"+" key will expand it. When the selected node
shows with a - sign next to it, pressing the + key will collapse
it back to its original state.
When
the selected node has sub-nodes, the + sign will not display at
its side. |
The 'Project Explorer', as all the Movicon windows, can be 'Docked
and kept in foreground view' as described in the section titled
"Docking Project
Windows".
|
The project structure's items, displayed
in the "Project Explorer" window, appear in alphabetical
order the first time a resource is explored. When the number of
items to be put into alphabetical order exceeds the value
of 30,000, they will not be put into order automatically to save
time. |
The 'Project Explorer' window divides into three different areas, which
can be exploded to display the contents or compressed to hide them. The
three areas are "Filter",
"Projects" and "Commands".
Filter
This 'Project Explorer' sub-window is used to create display filters
in elements from various Project Resource groups, displayed in a tree
structure in the Project's sub-window as described further ahead:
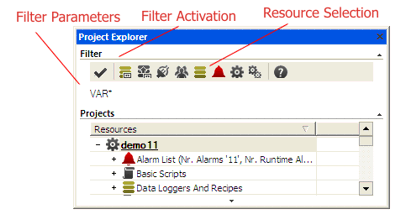
To execute a filter you must first type the text or the characters to
be filtered in the appropriate box. The "*" and "?"
jolly characters are also allowed. Then you will need to select the resource
group in which to activate the filter. This can be done by clicking
on the appropriate icon shown in the filter bar, or by directly selecting
the resource group in question in the 'Projects' sub-window. Once you
have selected the resource group, you can activate the filter by clicking
the  button in the filter
bar.
button in the filter
bar.
To delete any active filters,
simply cancel the characters entered in the filter box or leave the "*"
jolly character only, then click to activate the filter again.
Projects
This 'Project Explorer' sub-window gathers the project's resources together
in groups in a tree structure.
Each group is composed of elements
which can be added, changed and cancelled by the programmer in order to
complete the project as required.
Comands
This sub-window in the 'Project Explorer' shows a list of commands which
change dynamically according to the Resource Group selected at that moment:
For example, if you select the "Real Time DB" group, the listed
commands shown will be:
The same commands can also be accessed by right mouse clicking on the
desired element. To check the list of all the available commands see the
section on "Context Resource Menus".