An "Hour Selector" can also display the daily plan of a Scheduler setup in a Network Server project by using the appropriate property.
Movicon Help on Line - Rel. 11.7.1301
The Movicon "Hour Selector" is a configurable object which is associated to an object from the "Scheduler Object List" resource which is to be used to view and change the Scheduler object's daily plans.
The "Hour Selector " object is found in the "Objects" group from the "Toolbox Window".
After placing an "Hour Selector" on screen, you will be able to view and change the times set in the Scheduler object's hour plan it is associated to at Runtime.
|
An "Hour Selector" can also display the daily plan of a Scheduler setup in a Network Server project by using the appropriate property. |
The "Scheduler Window" can manage activation hour entries in two different modes:
Time Table
Grid
Either one or both can be set to use in the design mode. Please consider that once a change has been made in "Grid" mode, you will not be able to change the data you have entered when in "Time Table" mode.
Time Table
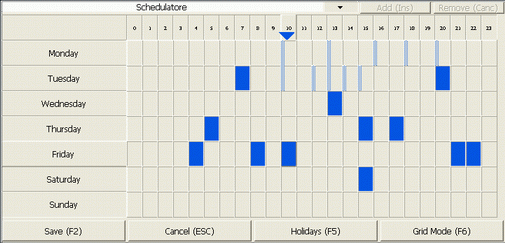
This type of display allows you to graphically view the times preset in the Scheduler selected by using the list-box at the top. In this way, you can change the times set by clicking on the box, as described above, in 15 minute resolutions. Only activation times of commands can be changed and not the variables associated to them. The "scheduler Window" displays as below:

A Scheduler Window displayed in 'Time Table' mode
Modifying planned times
The commands used to set the times in the scheduler window are as follows:
Click on the day -> Set or delete all the 24 hours of that day of the week
Click on the hour -> Set or delete that hour in all the days of the week
Click on the hour and day intersection box - > Set or delete the 24 hours in all the days of the week
One click on an hour box will set the time by a quarter of an hour precisely. An hour is made up of four 15 minute resolutions. Each additional click will change the hour box according to the sequence below:
one whole hour selection
the first 15 minutes in the hour selection
the first 30 minutes in the hour selection
the first 45 minutes in the hour selection
the last 15 minutes in the hour selection
the last 30 minutes in the hour selection
the last 45 minutes in the hour selection
deselect the whole hour
Grid
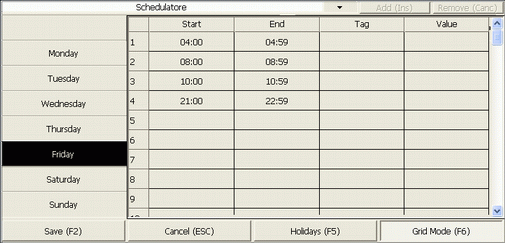
This type of display allows you to view the planned times of the Scheduler selected from the list-box in another table format. In this case each row in the table represents a command activation time. A maximum number of rows can be set using the object's 'Max. Nr. Grid Rows' property. Unlike the 'Time Table', you can set times with minute resolutions by entering the exact times you wish in hours and minutes to start and end the command's activation in the two respective 'Start' and 'End' columns directly. Furthermore, you can select the variable, on which the command is to act, from the 'Tag' column (the command is the one set in selected Scheduler's 'Commands List' and should be a "Variable" command type). You can also set the value in the "Value" column to activate in the variable (ie. if a 'Set' command of a variable, the variable will be set to the value entered in this field).

A Scheduler Window displayed in 'Grid' mode
When you use the "Tag" and "Value" columns in the Scheduler window to insert variables for command executions, you will need to take into account that the Scheduler will behave in the following ways:
When there are several commands on Variable on the Scheduler's "Commands ON" list, only the first command on variable will be executed and applied to the new variable selected in the "Tag" column.
When there are other commands on the Scheduler's "Commands ON" list (in addition to those on variables), they will not get executed. The 'set' variable action replaces the command list with only one command applied to the variable specified.
The 'set' variable action is executed only in the Scheduler's "Commands ON" command list, while the "Commands OFF" command list is normally executed with the original planned settings.
Modifying planned times
To modify the grid just click on the field desired to switch into editing mode if the Scheduler selected allows this.
By using the "Add Scheduler" and "Remove Scheduler" commands, you will be able to add or remove new Scheduler objects at runtime (only those Schedulers added in runtime can be removed afterwards). In this case, you will onlybe able to execute the Set command of the variable specified in the "Tag" column with the relative value in the "Value" column. You will not be able to insert runtime command list. When using the Runtime Schedulers, you will not be able to manage the "Commands OFF" command lists either. Therefore, an eventual Command OFF should be managed by inserting another Set command of the variable, for example by setting it to the "0" value.
|
Scheduler objects created at runtime are set to support holidays. When the “Holidays” button is not present in the “Scheduler Window” object (because it hasn’t been enabled), the runtime schedulers will be added with the option to manage holidays based on the Sunday hour plan. The minimum and maximum limits in the Variable’s “Scaling” properties (“Scale to Min.” and “Scale to Max”) will be considered as the minimum and maximum limit settings of the value relating to the variable only when the “Tag Column” is shown in the Scheduler object and in which the “Variable” to be changed has been set. In fact, if the variable command is not set, the value will be simply be passed to a command of another type. When the set value exceeds the minimum and maximum value range set in the Variable’s “Engineering Unit” properties, a warning will sound, or the “Value Error String” will display if set to do so in the Scheduler Window object. When the “Add Scheduler Button” is enabled, the Scheduler selection ComboBox will become editable at runtime. The “Save” is used to save the “.shp” file in the project’s “Data” subfolder. However, the file is only saved when a valid format has been entered in both the “start date” and “end date” fields correctly. |
Scheduler selections made by using the list-box and any scheduler modifications performed can be conditioned by the Access Level settings which have been preconfigured in the Scheduler. Based on these settings, the Scheduler can be set to display in the list-box for selecting, modifing or viewing only. In addition to this, please take into consideration that the "Write Access Level" variable properties of the Scheduler's set planned times which can also be modified. The settings in these properties will determine whether variables can be made available in the "Tag" column for selecting or not.
If the "Always Visible" property is enabled, which is available for both the Schedulers and Variables ("Access Level" propriety), the Access Level settings will then no longer be considered and the Scheduler and the Variable in question will always be available for selecting within the "Scheduler Window".
Scheduler objects which are added at runtime are set with a read and write Access Level equal to the access level of the user currently logged in at that moment. In this way, the user will be able to edit the scheduler, while other users who do not have the same equal access levels will not be able to. Schedulers added without any users currently logged in, will be always editable due to the fact that their read and write access levels will be set at "FFFF".
|
When the project's Password management is disabled you will need to enable the "Always Visible" property for the Schedulers and Variables you wish to manage in the "Scheduler Window". |
Scheduler On/Off Command Activation
The Schedulers have been designed to activate a command on the rising edge and a command on the falling edge of the condition or area enabled when selected as "hour plan" . When the project is launched within a pre-scheduled time range, the ON command will activate if not already done so within that current day. However, if this command has already been activated for that day, it will not be reactivated again. This function is based on the fact that it may be necessary to activate commands only once within the pre-scheduled time range and not necessarily at every restart according to the applications and preset command types.
Command events are recorded in the "ProgjectName_SchedulerName.sst" file found in the project's DATA folder.
If commands need to be activated at each project restart, you can use the object's enable variable as an alternative. If you insert a non-retentive enabling variable in the object's "Scheduler Enable Variable", which when set to one at runtime enables the scheduler, Movicon will activate the ON commands that have been preset in the time range of that moment.
The enable variable can also be used to force the scheduler's OFF command activation. This is done by simply setting the variable value to zero.
When a variable is specified in the Scheduler window's 'Tag' column (which will replace the scheduler's original command variable), this command will become a scheduled command. These commands are not managed by the ".sst" file to manage command activations and, therefore, these commands will be activated at every application restart or at each new save of the scheduler's programming save if they are within the scheduled time range (there is no retentivity management due to the fact that the commands have already been executed).