In the following link you will find all the symbols in the Toolbox Library in PDF.
https://www.progea.com/wp-content/uploads/2021/11/toolbox-doc_raster.pdf
Movicon.NExT Help on Line - Rel. 4.2.358
Movicon has a library called the Toolbox which is full of ready-to-use, predefined and configured objects. This Toolbox can be accessed from the screen using the Toolbox tab located to the right of the workspace.
|
In the following link you will find all the symbols in the Toolbox Library in PDF. https://www.progea.com/wp-content/uploads/2021/11/toolbox-doc_raster.pdf |

The "Toolbox" window contains Objects and Controls subdivided into different groups. It is activated using the relative tab on the right hand side of the screen and can be kept open or positioned as pleased within the workspace.
How to Insert objects from the Toolbox
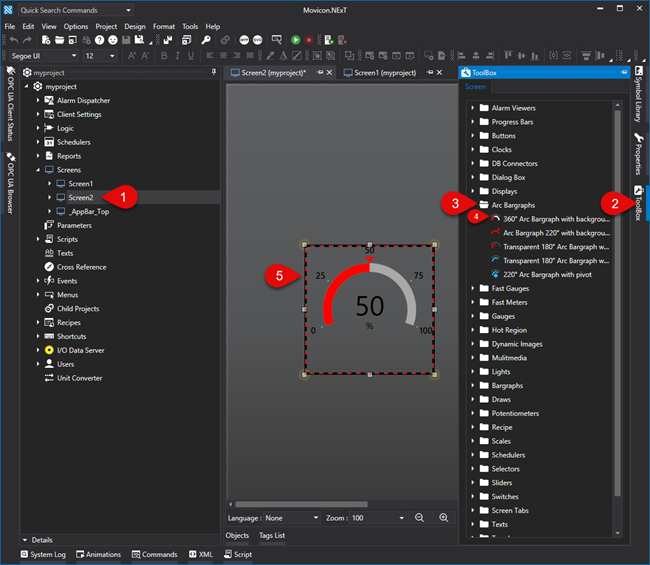
To insert an object from the Movicon Toolbox follow these quick and simple steps:
Open the screen of interest within the Movicon workspace
Activate the Toolbox if not already opened in foreground
Open the object group desired by clicking on the icon to expand the group
Select the object you which to insert on screen
Position mouse pointer with attached object onto the desired area within the screen and click to release the object on that point.
You can also drag and drop the object on screen directly from the Toolbox as well.
|
Each object inserted on screen can be configured as pleased using its properties by means of the Properties Window. |
|
If you wish to insert static text in the object's title you can get text to go to the beginning of the row underneath by inserting the “\n”. For example, by digiting the following row:
Flour\Egg\nSugar
the result will show the text on three rows as follows:
Flour Egg Sugar
However, when you use an ID String, you will only need to manage text on as many rows needed directly in the string table. |
|
Texts in objects that use String ID can be customized using Special string ID. |