All the symbols from the Symbol Library can be found in the following link in PDF:
https://www.progea.com/wp-content/uploads/2020/09/simboli-doc.pdf
Movicon.NExT Help on Line - Rel. 4.2.358
Movicon.NExT offers Symbol Library rich in XAML vector symbols (static and animated) that come predefined and ready to use.
This Symbol Library can be accessed from screens using the relevant TAB on the right side of the workspace.
|
All the symbols from the Symbol Library can be found in the following link in PDF: https://www.progea.com/wp-content/uploads/2020/09/simboli-doc.pdf |

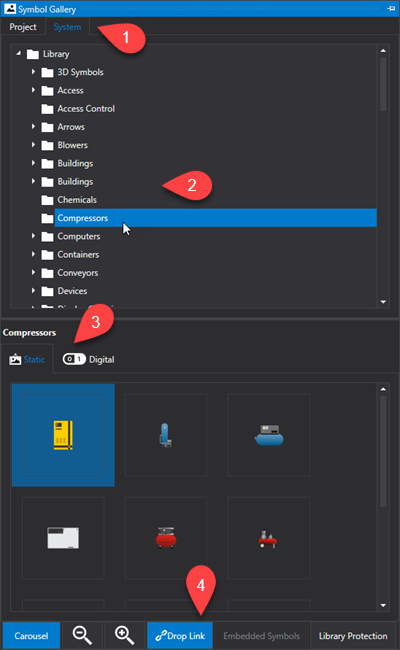
The elements used to build the Symbol Library are:
1. System and Project Tab selection
System: System Library
Project: Custom Symbol Library (please see topic on: "Creating Composed Symbols" for further information)
|
The Movicon.NExT System Symbol Library is the result of industrial design work protected by Copyright. Therefore, the symbols provided by the system library are protected and can only be used for their static or dynamic representation on screens. It is not possible to take the symbols apart or use their XAML source code for any advanced customization. If the user wishes to access the structure of any one of the symbols, they will need to purchase a user license which comes with the unlock code to remove the library's protection. |
|
When the user obtains the library's unlock code, it is important to remember that the symbols remain subject to the User License terms and conditions and Copyright laws. The user must not reveal the protection code or use symbols other than within their own Movicon.NExT projects. |
2. Tree structure that lists symbol categories.
3. Static and Animated Tab selection:
Static: static vector symbols
Digital: animated vector symbols with digital animation (e.g. value 0 or 1)
Analog: animated vector symbols with analog animation (e.g. value range from 0 to 100)
4. Library Toolbar:
Carousel/Grid: previews display of symbols in grid or carousel mode.
Magnifying glass icon: zooms symbol preview
Drop Link: allows you to use symbols on screens with links to symbols in the library (parent-child relationship)
Embedded Symbols: allows you to use symbols on screens as independent symbols (without parent-child relationship)
|
This option is not available for the system symbol library. |
Library Protection (System Library): This button, if the System Library is active, allows you to decrypt the protected symbols of the system library using the code provided on request.
Library Protection (Project Library): This button, if the Project Library is activated, allows you to protect / unprotect the personal project library by defining / using a personal password.
How to insert Symbols in projects
To insert a symbol from the System Library on screen simply:
Open the Screen of interest in the Movicon.NExT workspace.
Activate the Symbol Library if not already in the forefront.
Select the symbol group desired from the window's tree structure list and click on the icon to expand the group.
Previews of symbols are shown at the bottom of the window. Select the symbol desired and drag it onto the screen.
|
When a library symbol already used as a "Linked Symbol" is modified and updated in the library, all the "Compiled" project screens are deleted and then recreated with the new updated symbol. If this symbol has been used in several different projects, to update the symbol in the other projects as well, it is necessary to manually copy the updated library files in all the other projects that use the symbol. At this point, however, it will also be necessary to manually invalidate (delete) all the compiled files of the projects (or open the screens using the symbol in design mode and then save them in order to recreate the compiled files recreated). |
|
How to disable the ScreenCompiler tool: The ScreenCompiler tool is enabled by default, after a setup. In case of problems, this feature can be disabled by modifying the appropriate parameter in the "ScreenCompilerManager.dll.config" file. The parameter is: "ScreenCompilerEnabled" when it is set to "True" the ScreenCompiler is active, when it is set to "False" the ScreenCompiler is inactive. It is also possible to enable the Log for the ScreenCompiler if necessary (by default it is disabled). The parameter, inside the "ScreenCompilerManager.dll.config" file, is: "ScreenCompilerTraceEnabled" when it is set to "True" the Log of the ScreenCompiler is active and the messages are stored in the SystemLog of the project, when it is set to "False" the Log of the ScreenCompiler is inactive. |