
both the platform's Server and Client components are independent and therefore can be started up independently in runtime.
Movicon.NExT Help on Line - Tutorial
The Platform.NExT platform project is fundamentally composed one part Server, designated to perform communication tasks and manage data, and one part Client which is mainly composed of the Movicon.NExT for project's HMI graphical interface.
|
|
both the platform's Server and Client components are independent and therefore can be started up independently in runtime. |
The whole project can be simply be started up in runtime directly from the platform's workspace using the "Start Runtime" command available from the workspace's main "Project Manager - New Resources" ribbon. The startup command can also be made available by right clicking to open the project's contextual menu in the Project Explorer Window.
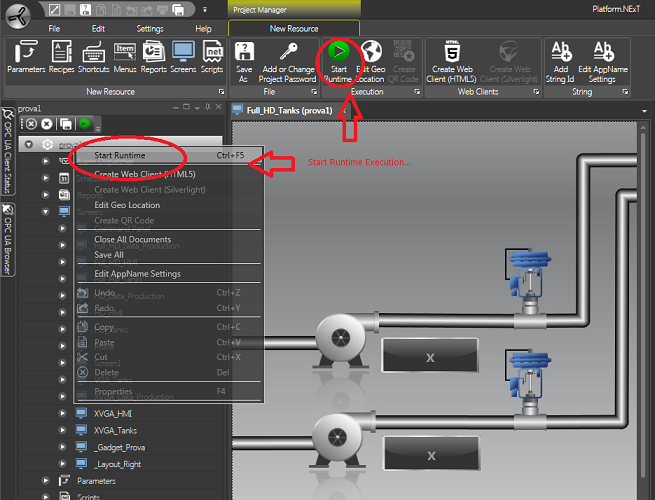
The Start Runtime command starts Project up in runtime
When the "Start Runtime" command is activated Movicon will check whether the Server module has been started up. If this is the case the Client module will then be started up otherwise both Server and Client module will be started up together.
Start Project from command line
The following command can be used to startup a Project directly in Runtime without opening development/ design mode beforehand:
"C:\Program Files\Progea\Movicon.NExT\MoviconNExT.exe" E:\Projects\Test01\Test01.ufproject -start
where:
<E:\Projects\Test01\Test01.ufproject -start> represents an example of a PlatformNExT project path and position.
This command line will start up both the Project's Server and Client modules. It can also be created as a shortcut or defined in the Windows automatic startup.
Project Startup Type
By using the project's "StartType" property you can select the project startup window display type which will show when activating Runtime (Start Runtime command).
The available modes are:
Main Screen: the startup page will be one of the screens created and inserted in the project. The screen to be used as the startup screen can be selected from the "MainScreen" property. If this property is left empty, Movicon will search for a screen named "Main". If this screen is found it will be started up otherwise the first project screen in alphabetical order will be started up.
Tile Page: The start up page will automatically be shown with the typical Windows 8 tile interface. It will be composed of with same number of tiles as there are project screens. Each tile will show the name of the screen and its preview. A click of the mouse will open the corresponding screen.
Gallery Page: The startup page is automatically built with the Gallery interface with a carousel preview of the project screens. The preview of screens can be scrolled back and forth until the desired screen is found. Once found simply click to open it.
Geo Page: The startup screen will be a geographic map in which the locations of project's resources are highlighted. In this case the project is usually composed of one or more child project located in different geographical areas. The click on one of these hot regions will open the corresponding project.

The project startup type is defined in its "StartType" property
Project are created with the "TilePage" setting for default. For example when starting up a project in Runtime in this mode you will get a startup page like the one shown below. The tiles can be positioned and grouped in persistent mode as pleased and also in function with folders in which the project screens have been placed.
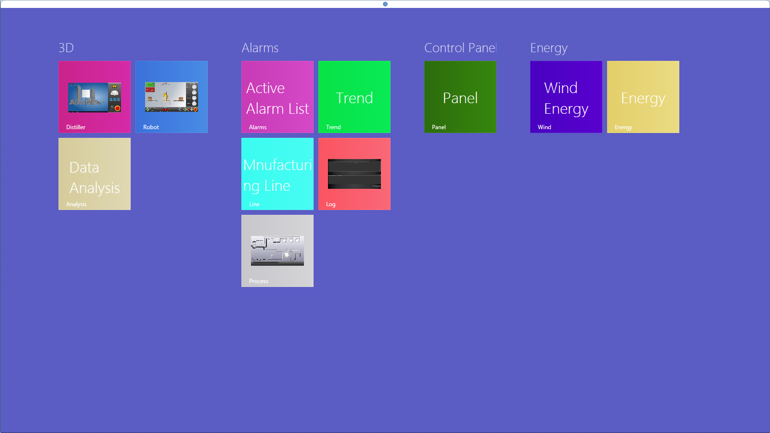
Project start runtime page in "TilePage" mode
Stop Project Runtime
The "ALT+F4" system keys can be used for stopping project runtime after project has been started up.
It is also possible to predispose useful command objects or menus in the project to startup and stop project runtime according to the commands provided in the object command list.
You can also predispose a close window command in the title bar of the corresponding window display according to Windows standards. However this is only possible if specified in the screen "WindowStyle" property.
![]()