Introduction
Hello and welcome to the new quick start guide on how to best use
Movicon.NExT™.
In this technote we will explore the Movicon.NExT™ Workspace.
The Workspace
Once you have started up Movicon.NExT by double-clicking on the
desktop icon and opened the project you will be presented with the
Movicon.NExT workspace.
The workspace has been designed according to the latest ergonomics
concepts offering an interface compose of panes and windows which
can be organized to meet the user's specific need.
The main features of the workspace are:
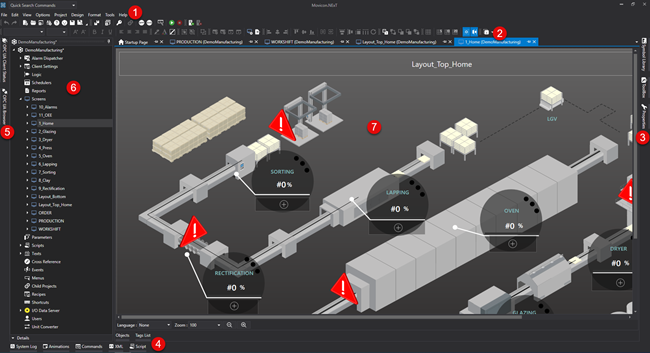
- The menu
- Customizable toolbars
- The Properties window, Toolbox and Symbol Gallery
- The System Log, Commands, Script, XML and Animations panes
- The OPC UA Browser and OPC UA Client Status panes
- The Project Explorer window
- The canvas where work is carried out.
The various panes have three modes with which they can be managed:
- Floating: this is the default setting. The tab representing the pane or window is placed on the worksapce border and activates when clicked on.
- Docked: docked windows or panes can be undocked by clicking the pin icon after which they will remain visible and available for use.
- Popup: once this type of window is dragged onto the workspace it can be handled as a popup within the editor without being docked. To redock it, simply drag it towards the edge of the workspace.
- Go to the File menu.
- Click on the Workspace Layout item and check that the Manual Layout option is enabled.
- Click the Save Layout command in the same File > Workspace Layout menu to save the current workspace interface configuration.
- Give the interface that you are saving a name by entering a string in the Layout Name field.
- Click OK to confirm.
This can be done using the Movicon.NExT editor as follows:
- Go to the File menu.
- Click on the Workspace Layout item and check that the Manual Layout option is enabled.
- Click the Load Layout command in the same File > Workspace Layout menu to open the grid of the saved and available workspace interfaces.
- In the grid that displays, select the workspace you wish to load.
- Click OK to confirm.
In addition to saving and loading workspace interface configurations, you can also import, export or remove them or restore the one for default.
To export/import a workspace interface configuration, simple copy and paste the configuration file manually by using the Resource Explorer provided by the Windows operating system.
By using the Windows browser tool proceed as follows:
- Open the %ProgramData%\Progea\Movicon.NExT.Layouts folder.
- Copy all the folder's contents or only subfolders of the desired configurations.
- Paste the subfolders in the %ProgramData%\Progea\Movicon.NExT.Layouts folder on the target computer.
Ultimately, if you wish to restore the original workspace interface configuration, you can do by opting to use one of the following two procedures after making sure to have closed all the open Movicon.NExT instances beforehand:
- Startup the Movicon.NExT instance by pressing the CTRL key on the keyboard until the editor has completely loaded.
- Delete the contents of the folder found in the %LocalAppData%\IsolatedStorage path.