Introduction
Hello and welcome to a new guide on how to best use Movicon.NExT™.
In this technote we will show you how to configure the Alarm Dispatcher to send notifications by email.
Example
We will use an example to give you a better idea of how to do this.
How to create the tag
Having already started up the software and loaded the project:
- Open the I/O Data Server in the project tree within the Project Explorer window.
- Go to the Tag List by selecting the appropriate I/O Data Server tab.
- Right click on the workspace and select the Add New Tag from the menu that appears.
- Configure
the tag using the properties window in the following way:
Name boolTest Model Type Variable Data Type Boolean
- Confirm these changes by clicking on the Accept Changes icon located on the toolbar at the top of the Properties window.
How to create and associate the alarm
We shall now create an alarm in this way:
- Open the I/O Data Server located in the Project Explorer window’s project tree.
- Access the Alarms tab by selecting the corresponding I/O Data Server tab.
- Expand the items in the Alarm tab until you reach the Source item.
- Select and right-click the Source item to open its contextual menu.
- Select the Add New Alarm Definition menu option and configure the alarm as follows:
Name boolTestAlarm Alarm Type Trip Alarm Activation Condition Equals Activation Value 1
- Click the Accept Changes button on the alarm properties window’s toolbar to confirm.
Now that we have created and configured the tag and alarm, we can go ahead and assign the two elements:
- Select the alarm you have just created in the I/O Data Server’s Alarm tab.
- Right-click it and select the Assign Tag option from the menu that appears.
- Select the previously created boolTest Tag from the table and click OK to confirm.
How to create the screen
Now, we will need to create a screen:
- Look for the Screens resource in the project's tree structure in the Project Explorer window and select it.
- Right-click it and select the New option from the menu which opens.
- A New Screen popup will appear through which you can set the screen's main properties. Configure the screen as follows:
- Width: 1920
- Height: 1080
- Name: Main
- Click the OK button to confirm the configuration.
Once the screen has been created, you can then change the project's properties by inserting the screen as the project's Main screen which will show when the project starts up. To do this:
- Select the name of the project from the application's tree structure.
- Open the Properties window.
- Change the following project properties in this way:
- Startup Page Type: Main Screen
- Startup Screen Name: Main
Once you have finished configuring the project startup page, click on the Save All icon located on the toolbar at the top to save the project.
Now, open the Main screen and click on the Toolbox tab on the far
right of the editor window to open the Toolbox library provided by
Movicon.NExT.
Go to the Toggle Switches folder and drag a Vertical Switch onto the
screen.
Drag the boolTest Tag onto the object to associate it.
How to create a user within the project
To use the Alarm Dispatcher correctly, you will need to create a
user within the project.
This user will be the one who receives notifications from the Alarm
Dispatcher.
To do this:
- Double-click on the Users module located on the project tree.
- Once the module’s configuration window has displayed, right-click on the Admin folder and select the Add New User option to insert a user in the selected folder.
- Configure the user as follows:
- User Name: User1
- Password: 1111
- Confirm Password: 1111
- Email - Address: insert User1’s email
- VOIP - Telephone Number: enter the User1 user's VoIP number
- SMS: insert the User1 user's phone number
- Telegram - Chat ID: enter the User1 user's Telegram Chat ID
How to configure the Alarm Dispatcher’s Email plugin
We shall now configure the Alarm Dispatcher:
- Double-click on the Alarm Dispatcher module located on the project tree in the Project Explorer window to open it.
- Leave all the default settings as they are in the General Settings tab that opens and select the Plugin List tab.
- Right-click within the Plugin List’s workspace to insert a plugin by selecting the Add New Plugin from the menu that appears.
- Select the Send SMTP Mail plugin and click OK to confirm.
Now that the SMTP Mail plugin has been included on the list, we can now go ahead and configure it:
- Select and right-click the plugin and select the Edit Plugin option from the menu that appears.
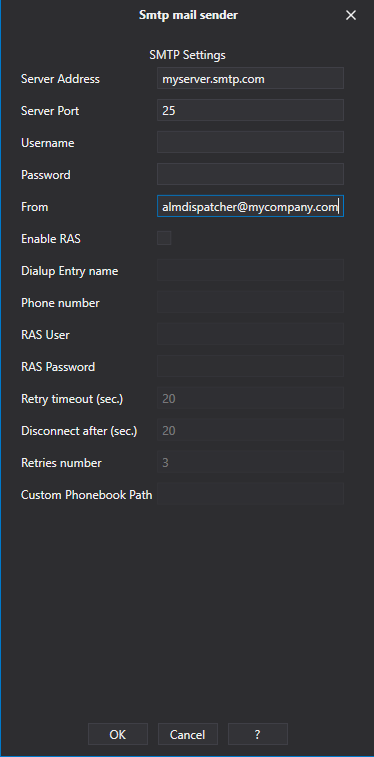
- Configure the popup that displays by inserting:
- SMTP Server Address.
- The Server Port used.
- Username and Password of the user who will connect to the configured SMTP server.
- The sender’s email address.
- Click the OK button to confirm.
Next, go to the Notifications tab to configure the message to be sent:
- Right-click on the workspace in the Notification tab and select Add Notification from the menu that appears.
- Configure the notification by changing its properties appropriately. For example:
- Notification Type: Local
- Plug In Name: Smtp mail sender
- Name: Notification
- Recipient: User1
- Text Message: Mail - New Alarm from boolTest
- Notification Tag/Area: boolTest
- Alarm Type: Trip Alarm
- Activation Condition: Equals
- Activation Value: 1
- Severity: 100
- Send on Event: ON
Save the project by clicking on the Save All button on the Movicon.NExT Editor’s toolbar at the top.
Runtime Test
Click the Start Runtime icon to test to see if everything works
in runtime.
Once the application has started up and the screen has opened, click
on the switch to change the boolTest value from 0 to 1.
In this condition, the alarm associated to the tag will activate and
the Alarm Dispatcher will send an email to the user to notify them
that the alarm is active.