Introduction
Hello and welcome to the new tutorial about Movicon.NExT™.
In this tutorial we are going to explore how to access the application you created with Movicon from a web browser enabled with the HTML5 technology.
Web Technology
There are at least three methods you can use to access your application by using the web technology:
- WebClient (WPF o SVG)
- WebHMI (SVG)
- Mobile App
The technology behind the Movicon.NExT Web Client is the most modern
and innovative solution for managing remote access to the supervision
system from any remote device or mobile over a local or public network,
VPN or internet, with the maximum simplicity and security.
The use of the Movicon.NExT Web Client is optional and must be enabled
on the Runtime Server License only to allow access to a desired number
of HTML5 users (Browsers) or WPF (Apps) simultaneously.
The Movicon.NExT technology allows you use the platform’s Web Server
features to distribute applications over on the Web to make it accessible
by remote Client devices that use the HTML5 technology.
Thanks to this new standard, clients can access the server as part
of cross-platform” approach, according to which the client can access
the server using any browser and device with any operating system,
without having to install additional tools locally to enable this
feature.
Clients are no longer passive: they can handle bidirectional communications,
user protection, database access and report presentations within a
Web context, without needing to install or configure anything on the
remote client.
WPF WebClient
To use the WPF Web Client, you will need to configure
the Microsoft Internet Information Services (IIS) Web Server. The
IIS is responsible for managing communications with the I/O Data Server
using the OPC UA protocol and for exposing the HTML5 Web pages for
browser access.
The use of the WPF Web Client requires the following configuration
requirements:
- A Server or Desktop version of the Microsoft Windows Operating System
- The Movicon.NExT I/O Data Server with enough WebClient users
- The Windows IIS Web Server integrated in the Windows Operating System
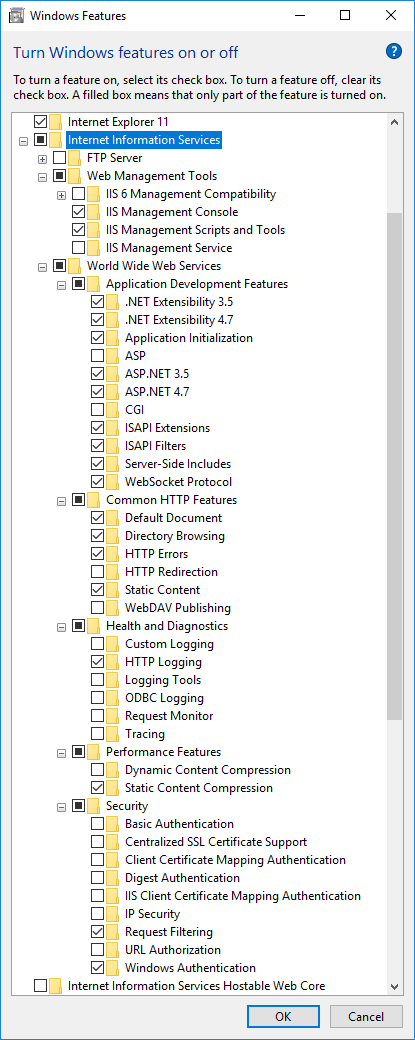
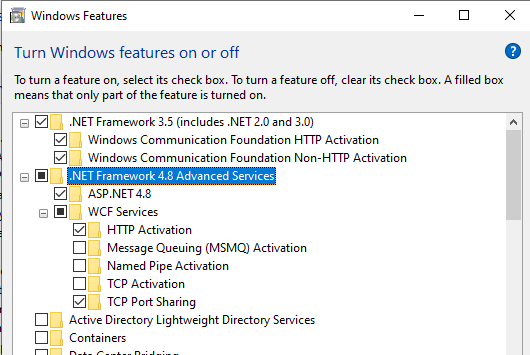
By taking Windows 10 as an example, to enable IIS and use the web client correctly, you must install the following features from the Control Panel menu > Turn Windows Features On or Off:
- .NET Framework 3.5 (includes .NET 2.0 and 3.0)
- :NET Framework 4.8 Advanced Services
- ASP.NET 4.8
- WCF Services
- HTTP Activation
- TCP Port Sharing
- Internet Information Services
- Web Management Tools
- IIS Management Console
- IIS Management Scripts and Tools
- World Wide Web Services
- Application Development Features
- .NET Exstensibility 3.5
- .NET Exstensibility 4.8
- Application Initialization
- ASP.NET 3.5
- ASP.NET 4.8
- ISAPI Extension
- ISAPI Filters
- Server-Side Includes
- Web Socket Protocol
- Common HTTP Features
- Default Document
- Directory Browsing
- HTTP Errors
- Static Content
- Health and Diagnostics
- HTTP Logging
- Performance Features
- Static Content Compression
- Security
- Request Filtering
- Windows Authentication
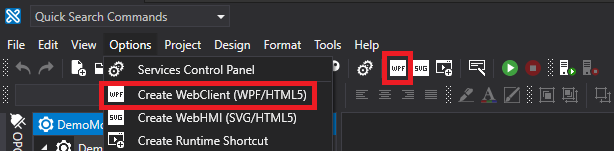
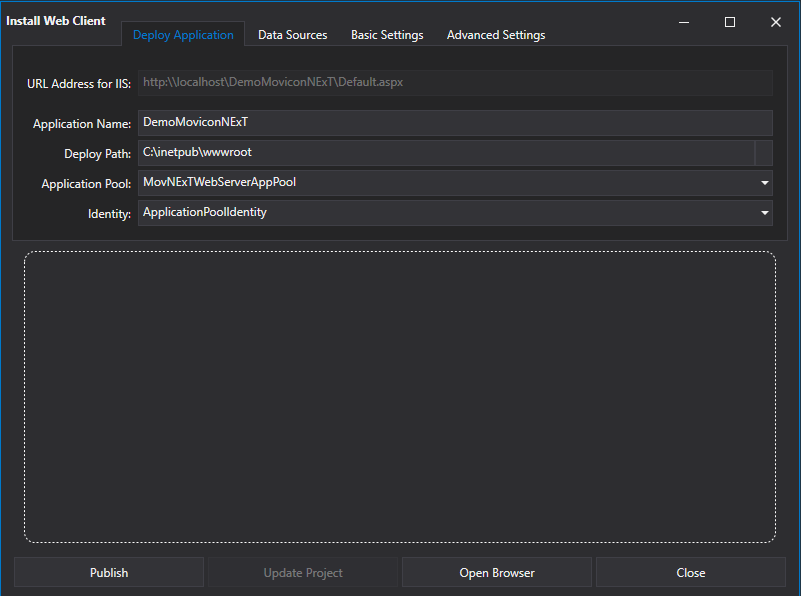
After the application’s configuration and development has been completed, you must create the web application by selecting the Create Web Client (WPF/HTML5) option.
At this point, you can then configure all the options to create a fully functional application by choosing where it is to be distributed, which data source it is to use, its basic settings such as the application’s name, and its advanced settings such as session timeout.
Once this part has been completed, you can then connect to your application by pointing to its URL using a HTML5-enabled Web browser, such as Google Chrome or Microsoft Edge, and use your project over the Web.
SVG WebClient
The SVG Client is another type of WebClient. The main difference
between the SVG WebClient and the WPF WebClient is that the SVG WebClient
does not require Windows IIS as a Web server, because it has its own
integrated Web server and, therefore, all the graphics are processed
on the Client and no longer on the Server.
In this scenario, all the Movicon.NExT screens will be converted to
SVG and inserted in graphical HTML5 Web page when the project is distributed
on Web Server by the Movicon.NExT editor.
Once the project has been completely developed, you will need to go
to ‘Options’ and then select the "Create WebHMI (SVG/HTML5)"
option in order to use it.
When doing this, the Movicon.NExT editor will convert all the screens
to the SVG format.
If any errors should occur during the graphics conversion process or
with any of the user controls, because not yet supported, you can
view the system log to see which object has not been converted and,
therefore, not usable on the WebClient.
After the conversion process has terminated, you will need to install
the "Movicon.NExT WebClient WebHMI" service to use the SVG
Client. This is done from the Movicon.NExT editor:
- Go to Options
- Click on Service Control Panel
- Select Movicon.NExT WebClient WebHMI
- Click on the Install button
Install the service, click on the Start button to launch the I/O Data Server and then connect to your application by using a HTML5-enabled browser with one of the following URLs:
- http://webserver_ip_address:5000
- https://webserver_ip_address:5001
Movicon WebHMI
The Movicon WebHMI is another type of Web access.
Movicon WebHMI is the solution created to visualize projects, which
have been with Movicon.NExT, over the web using a browser.
Movicon WebHMI makes project pages available in SVG/HTML5 format by
using an integrated Web Server. This Web Server communicates with
the Movicon.NExT I/O Data Server using the OPC UA protocol.
Applications built with Movicon WebHMI can be divided into two main
categories:
- WebHMI Client: this is used to access the project created with Movicon.NExT by using a HTML5-enabled (such as Google Chrome, Microsoft Edge, etc.) as an alternative to the WPF/HTML5 WebClient.
- WebHMI Runtime: this is used as a standalone application for per Windows/Linux HMI which works with the I/O Data Server and displays graphical pages locally using a local browser opened at full screen.
Let’s examine the second type.
Used as standalone application, you can install Movicon WebHMI in both
the Windows and Linux environments. The Deploy Server must be installed
to distribute the project in both these scenarios.
The important thing here is the value selected for the Project Type
option because Movicon.NExT will change its configuration according
to the project type selected. If you select WebHMI as the project
type, the editor’s windows will show only those functions supported
and the objects from the toolbox used on screen that are not supported
by WebHMI will be highlighted in yellow.
Once the WebHMI application’s development stage has terminated, you
will need to go ‘Options’ and then click on the "Create WebHMI
(SVG/HTML5)" option.
By doing this, the Movicon.NExT editor will convert all the screens
to the SVG format.
After the screens have been converted, a message will display asking
whether you wish to deploy the WebHMI Server and the project on the
remote node or not. When selecting ‘yes’, a window will open in which
you should enter the host’s profile credentials and IP Address. It
will also show control commands to start the deploy operations or
run the services on the remote node.
In addition, this window will also show how the download is progressing,
in the form of a progress bar, and information on the remote device,
such as the CPU use of the installed services for example.
Once the service has been installed, click on the Start button, run
the I/O Data Server, and then connect to your application by using
a HTML5-enabled browser with one of the following URLs:
- http://webserver_ip_address:5000
- https://webserver_ip_address:5001
Mobile App
Finally, Movicon.NExT also provides users with a mobile app to control
their application. This app is available for Android, iOS and Microsoft
devices, and can be installed on tablets, smartphones and wearables.
This app is downloable from the respective app stores.
To use the app, you will need to configure it on the mobile devices
you are using and configure Movicon.NExT WebClient App service on
the Web Server.
Let’s start with configuring the Web Server by using the Movicon.NExT
editor:
- Go to the Options menu
- Click on the Services Control Panel
- Select the Movicon.NExT WebClient App
- Click on the Install button to install the service
- Click on the Start button to run the service
Once the service is running, you can continue with configuring the
Movicon.NExT app on your mobile device.
To do this:
- Open the Movicon.NExT app on your mobile device
- Press the + button to add a new connection
- Enter a string in the Name textbox to give your connection a name
- Select the Web protocol (http or https)
- Enter the Web Server IP address
- Choose the appropriate Server port according to the protocol used (8089 when using the http protocol; 8090 when using the https protocol)
- Save the configuration by pressing the Save icon
Once the configuration has been saved, the deployed project will automatically display in the app on the mobile device.