Movicon Help on Line - Rel. 11.7.1301
The Screen Navigation Editor resource allows you to manage screen navigation graphically and intuitively.
By using the "Screen Navigation Editor" resource you can define screen navigation graphically. This means that you can create screen connections that will automatically convert into a navigation bar to display in the different screens during runtime.
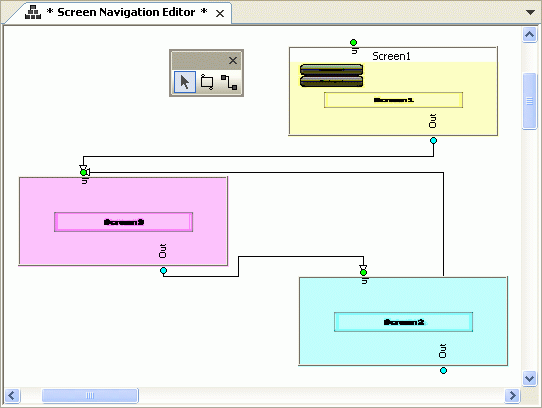
This is done by creating a navigation map using an editor specially for this purpose and which is opened with a double-click on the "Screen Navigation Editor" resource from the "Project explorer" window. This editor opens up with an empty screen within which you can create the screen navigation map:

An example of a "Screen Navigation" page.
Creating the Navigation Map
The "Screen Navigation Editor" resource will open as an empty screen that can be set with a different back color, size etc., through its properties. "Embedded Screens" from the Toolbox are then inserted in this screen by using the appropriate commands. Each embedded screen has two dots known as Synapses one for Input ("In" green dot) and one for Output ("Out", light blue dot). The associations of the Embedded Screens to be displayed are done through their properties. You can create a navigation network by connecting the Embedded Screens to each other. For instance, if you connect the "Screen1" Out Synapses to the "Screen2" In Synapses, "Screen1" will then be able to provide commands, such as an open command, to open "Screen2" during runtime. During the Runtime mode the navigation map is converted into a "Button Navigation Bar" and made available in the screen opened at that moment. In the Button Bar, which will be generated for each screen, a button will be made available for each out connection ("Out" Synapses) presented in the navigation map of that screen. The name of the destination screen will be displayed in each bar button.
Once the "Screen Navigation Editor" window is opened , a toolbox will display with the tools needed for creating the navigation map:

By using this toolbox you can select the following objects:
Pointer: this selection consents to restoring the mouse back to its original pointer image in order to select the various objects on screen.
Screen: this selection consents to adding an Embedded Screen on the page. The Embedded Screen will already have an "In" and "Out" Synapses and once inserted a window will open for selecting a Screen to associate to the object. The Embedded Screen will display the Screen's static image but you can change the associated Screen through the object's properties later. After having inserted the object the mouse pointer will be automatically restored and therefore you will need to select the command from the toolbox again for inserting another object.
The drag&drop techniques can also be used for associating the Screen to the "Embedded Screen" object in the Project Explorer Window even Screen belongs to a Child project.
Connector: this selection consents to connecting an "Out" Synapses to an "In" Synapses. In order to do this you will need to click on the "Out" Synapses of one Embedded Screen (the pointer will change image only when clicked on the right zone) and the click on the "" Synapses of another Embedded Screen to connect them up. This procedure can then be repeated for all other connections desired. To restore the pointer back to its original image you will need to select the "Pointer" command from the Toolbox.
The navigation layout can be also be displayed in Runtime like any other screen page. In order to do this you will need to insert a "Screen Command" set as a "Open Normal (screen change)" action, and using "* Screen Navigation *" as the screen's name. This will allow you to get a graphical layout of the screen navigation map to use in runtime for changing pages: a click on an embedded screen on the map will open the screen it represents directly.
|
|
The screen navigation configuration set in the child project is used and not the one set in the Parent project when opening child project screens. Therefore different screen navigations are consented according the child project context being navigated. |
You can further customize the navigation button bar with other buttons by using the "Screen Navigation Style Properties" which allows buttons to be added for going back to a previous screen or to open the Startup Screen directly, etc.
|
|
The "Screen Navigation Toolbar" is also displayed in design mode in screens inserted in the navigation editor allowing you to see which space is available for inserting screens in beforehand. An uneditable grid area is shown within the screens indicated as "Screen Navigation Toolbar". |