The textual reports are also supported in runtime for Windows CE, which allows simple reports to be viewed, printed and saved.
Movicon Help on Line - Rel. 11.7.1301
Movicon allows you to use and manage simple textual reports. This report function's logic is based on a layout "template" file which the report file structure is defined. This layout supports fields with special syntax, with which variables or Data Logger or Historical Log fields are to be viewed and in which format. The textual reports can also be of "mixed" type, meaning that they can display values of some variables together with Data Logger or Historical Log field values in the same one report. In addition, there are other special fields for date and time printouts and page number. The layout file must be in a format that can be opened in text mode (ie. Rich Text Format or Text).
|
The textual reports are also supported in runtime for Windows CE, which allows simple reports to be viewed, printed and saved. |
|
The Textual reports can be used for visualizing Data Logger/Recipe data or data from the Historical Log tables as well (in this case, the data extraction query is executed in the Alarms table as well). |
Below are listed the commands which have been provided in the Command List's "Report-Recipe" and "Alarm" category for supporting the textual report management:
All these commands are synchronous to the user interface. This means that the project's user interface objects cannot be accessed until the command has been completely executed. For instance, the "View Textual Report" command requires that you close the application that opened the temporary file before using this command.
The commands listed above also need you to set parameters, found in the Command List's "Report-Recipe" and "Alarm" category and listed below:
Textual Report Template File (Layot File)
Textual Report Destination File
For further information on the above listed commands and parameters please refer to the "Textual Report Commands and Parameters" section.
|
The " Layout File" will be searched for in the project's resource folder by default if no path is specified. The "Destination File" will be created in the project's "DLOGGERS" folder for default if no path is specified. |
|
The command for managing Textual Reports can be also executed using the "ExecuteCommand()" script function. |
If a command for managing a Textual Report fails, the cause of the error will be reported in the project's Historical Log and Output Window. The list of error messages and their causes is reported in the paragraph titled "Textual Report Errors".
Template for Textual Reports (Layout File)
The Template document (Layout File) must be text type. The formats supported are ascii and unicode (.txt) generic text files and "Rich Text Format" (.rtf) files. To edit this document you will need to use an external program (not currently provided internal Movicon). We recommend you use "Notepad" for generic text files and "WordPad" for "Rich Text Format" files.
|
We advise against using "Microsoft Word" for editing "Rich Text Format" files. The main reason being is that when saving "Microsoft Word" files format characters are added between special fields by the textual report parser. As a consequence, these special fields cannot be viewed unless by re-opening the file with WordPad, re-formatting and saving it again. |
In addition to normal text in the Layout File, you can also insert fields with special syntaxes. These fields determine the point in which the textual report manager must insert variable values or Data Logger or Historical Log data. The square brackets are used for determining the beginning and the end of a special field. The special fields can be as follows:
Variable Field
You must use the following syntax to insert a variable value from the project's RealTimeDB:
[Variable|Format]
The "Variable" part indicates the name of a project variable. The special field is therefore replaced with the variable's actual value upon the moment the command is executed. If this variable does not exist, the special field is deleted and replaced with an empty text.
The "Format" part indicates the format to be used for representing the variable's value (see paragraph "Data Formats" for further details). When the variable is string type and you need that a fixed number of characters be printed in order not to mismatch format alignments, insert the same number of "x" as there are characters to be printed in the "Format" parameter:
[Variable|xxxxxxxxxx]
In the example above, after having inserted 10 "x", the number of characters that will be printed will be equal to 10. When the string is composed of number less than 10 characters, a number of spaces equal to the number of characters missing will be inserted. Control checks are only made if the number of characters is less than the number set. If the string exceeds the set number of characters, all of the string's characters will be printed.
Data Logger or Historical Log Field
To insert a Data Logger or Historical Log column value you must used the following syntax:
[$Column$|Format]
The "Column" part indicates the name of the Data Logger or Historical Log column to be displayed. The special field is then replaced with the value of the column presented in the data extracted from the Data Logger or Historical Log, using the row currently in use (the first row if command for next row has not been used). This special field will be deleted and replaced with an empty text, if the column does not exist in the data set extracted from the Data Logger or Historical Log.
The "Format" part indicated the format to use for representing the field value (see paragraph "Data Formats" for further details). When the data base field is string type and you need that a fixed number of characters be printed in order not to mismatch format alignments, insert the same number of "x" as there are characters to be printed in the "Format" parameter:
[$Colonna$|xxxxxxxxxx]
In the example above, after having inserted 10 "x", the number of characters that will be printed will be equal to 10. When the string is composed of number less than 10 characters, a number of spaces equal to the number of characters missing will be inserted. Control checks are only made if the number of characters is less than the number set. If the string exceeds the set number of characters, all of the string's characters will be printed.
|
A integer Value can be displayed, in cases concerning SQLCE, by specifying the "%g" format with the following syntax: [$column_name$|%g]. This should display the correct value in the Textual Report as the use of the "x" format will always show a '0' value in the Textual Report. |
Data Logger or Historical Log next row field
To insert the next value of a Data Logger or Historical Log column you must use the following syntax:
[!$Column$|Format]
In this case and different to the previous command, the data set pointer is moved to the next row before retrieving the column's value.
Page Number Field
To insert a Page number field you must use this syntax:
[&PageInfo&]
This special field is replaced with the current page number when command creates more pages. The page number is set to the "1" value at the command start and increases every time a new page of data needs to be created by re-reading the Layout File.
Date Field
To insert a Date field you must use this syntax:
[&Date&]
This special field is replaced with the current operating system's date upon command execution. The date is formatted using the operating system's local settings for short date.
Time field
To insert a Time field you must use this syntax:
[&Time&]
This special field is replaced with the operating system's current time upon command execution. The time is formatted using the operating system's settings.
Viewing Data Logger or Historical Log values
When the Data Logger or Historical Log fields are displayed in the Textual Report the moment the report is opened a data recordset is passed depending on the selection query set (if no query has been set all the table's records will be loaded). The values of the recordset's first record are displayed at this point on the report page. If there are other records, the pointer will then be increased and the new record data will be inserted on a new report page. In this way, the number of report pages will be the same number for records resulting from the selection query.
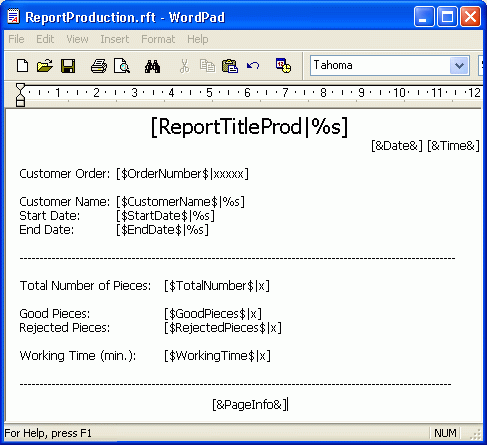
The report example below shows how values are displayed for project values and Data Logger fields. In this case the same number of report pages will be created for the number of records selected by the data extraction query.

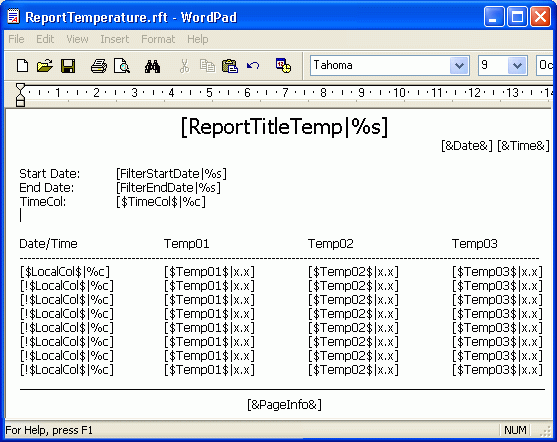
In order to display recordset data in table mode on the same page, you will need to insert the same database field many times using the syntax used for pointing to next record ([!$Column$|Format]). By doing this the records will display on the same report page. However, a new report page will be created if the number of records selected is higher than the number of rows set in the report.
The below report example shows how Data Logger values are displayed in table format.
