Movicon.NExT Help on Line - Rel. 4.2.358
The Movicon Graphics Editor provides users with variety of graphics editing operations for effective design engineering management and improved productivity.
Using Grids
Editing graphics can be made easier by using grids which are managed by means of using the "Grid" buttons on the screen's layout toolbar or by means of using the "Design" menu.
The main Grid options are:

Toggle Grid: Display or Hide the Grid according to the predefined resolutions (5, 10, 20, 40, 100 pixels).
Snap Grid : Snaps objects to the Grid.
Smart Snap : Snaps objects to align with other objects on screen.
Stack Order
The objects are stacked by overlapping each other in Tab order. The stack order, and therefore the priority in which symbols are displayed, can be changed whenever needed by using the buttons on the screens' toolbar, or by using the "Visibility Level Editor" command from the "Layout" menu, or ultimately using the 'Z layer' command from the contextual menu which opens with a right click.

Move First: Sets the stack order of the object selected at first place.
Move Last: Sets the stack order of the object selected at last place.
Move Next: Sets the stack order of the object selected at the next place.
Move Prev: Sets the stack order of the object selected at the previous place.
Set Z Order : Enables the stack order number of each individual object to display. The stack order can changed by clicking each object in the order desired. This command can also be activated/deactivated by using the “CTRL+D” combo keys.
Rotate - Flip
Each object inserted on screen can be freely rotated by clicking on its corners :
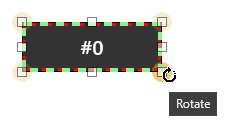
or by using the "Rotate" commands from the "Layout" menu or the "Rotate/Flip" command from the contextual menu.
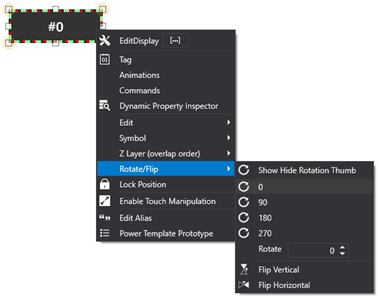
By using the menu you can also:
Display or hide the rotation center.
Manage the rotation by degrees.
Apply a specific rotation angle.
Flip the object over horizontally or vertically.
|
The rotation cannot be edited for the Pipeline, PolyBezier, Line, Polygon and Polyline controls. These control types need to grouped with other controls in order to change their position or rotate them at runtime. Therefore, the rotation menu cannot be selected for the Pipeline, PolyBezier, Line, Polygon and Polyline controls. |
Alignment
Editing groups of objects can be made easier by using the Alignment commands or using the toolbar buttons relating to the screen or the 'Align' command available from the "Layout" menu. These commands activate after selecting a group of objects and they always refer to the reference object. The reference object will be the one highlighted in the group of objects. In cases where a multi-selection has been the CTRL+CLICK command, the reference object will be the one in the last group selected and will be highlighted to distinguish it from the rest.

Align Left: Aligns all the selected objects to the left of the reference object.
Align Right: Aligns all the selected objects to the Right of the reference object.
Align Top: Aligns all the selected objects towards the top of the reference object.
Align Bottom: Aligns all the selected objects towards the bottom top of the reference object.
|
The commands indicated below can be used to align objects in respect to their barycenters:
|
|
Note: it is also possible to change the barycenter to rotate the object with: you will need to enable the barycenter point using the "Show-Hide Rotation Thumb" command from the menu which shows when right clicking on object. A red spot will show within the object which can then be repositioned as pleased by right clicking on red spot keeping the right key pressed down to move and change the object's rotation point.
|
Size
Editing the graphics of a group of objects can also be made easier by using the Size commands which are available by using the screens' relative toolbars or using the "Size" command from the "Layout" Menu. These command activate after having selected the group of objects and will always refer to the reference object. The reference object will be the one highlighted in the group of objects. In cases where a multi-selection has been the CTRL+CLICK command, the reference object will be the one in the last group selected and will be highlighted to distinguish it from the rest.

Same Width: Sets the same width for all the selected objects according to the reference object.
Same Height: Sets the same height for all the selected objects according to the reference object.
Same Width and Height: Sets the same Size (Width and Height) for all the selected object according to the reference object.
Spacing out objects
Space Distribution and Alignment of groups of objects can be facilitated by the use of Space Distribution commands, available through the "Placement" command of the Format Menu. This command activates when selecting the group of objects and distributes the selected objects by horizontally and vertically by aligning them evenly into rows and columns using the command's configuration window. Object Alignment is done according to the tab order (overlapping order) in which the objects were selected. Therefore they will be distributed with the first object at the top left, being the object tabbed/overlapped at the bottom, with the last object at the bottom right being the one tabbed at the top.
The end alignment result can be immediately displayed using the "Apply" command. Use the 'OK' button to confirm operation and the Cancel button to cancel operation.
Managing Borders
The borders of each object can be sized and set whenever needed using the actual object's properties. They can also be set quicker by using the buttons from the toolbar of the relative screen, or the commands from the Style commands from the "Layout" Menu.
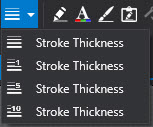
Stroke Thickness : This is used to set the object's border thickness.
Dash Array Stroke : This is used to set the object's border dash array type.
Edit Stroke color : This is used to set the object's border/back color.
Positioning
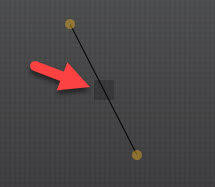
Once selecting objects such as lines or irregular polygons which have limited moveability given their shape and size, a semi-transparent square will show in the middle. By clicking and keeping pressed the mouse key on this square, you will be able to drag the object to any position desired.
Group
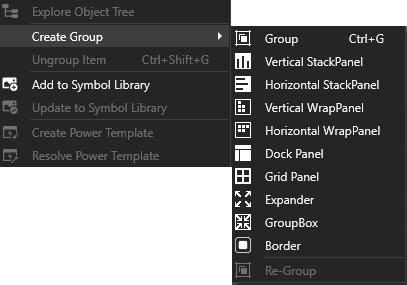
When selecting a group of objects, the Group commands can be accessed by using the 'Group' command from the 'Format' Menu accessed from the screen's toolbar, or the contextual menu.
Stack Panel: This is used to horizontally or vertically stack the selected objects one on top of the other, or side by side without touching. This type of grouping is handy when creating list of objects such as button bars.
Wrap Panel: Like the Stack Panel, this is used to stack the selected objects one on top of the other or side by side, but when one object is missing, the other objects will be regrouped to occupy the freed space.
