Deploy Server Installation Guide
The Deploy Server consents to
downloading the project and managing remote devices. As part of
Its installation, the .NET Core versions needed for its execution will
also be downloaded and installed. The Deploy Server can be installed
on the main devices that mount:
Installing
Deploy Server on Windows devices
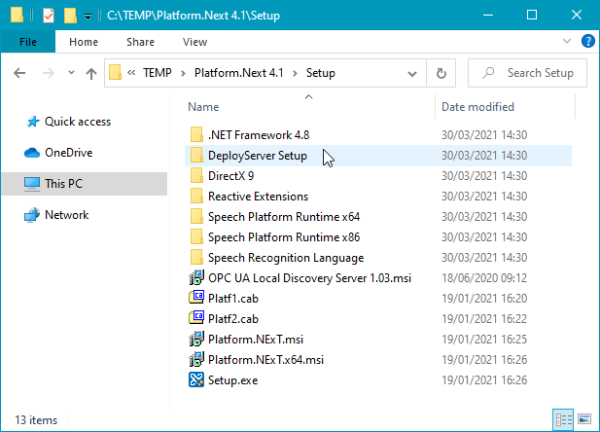
The Deploy Server setup is available
from the "DeployServer Setup" folder contained in the Movicon.NExT
setup:
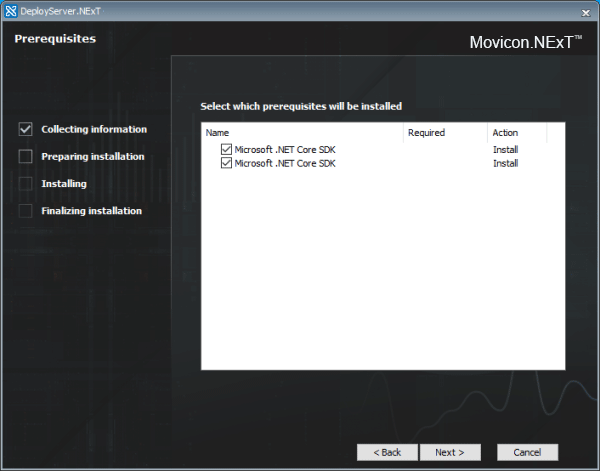
When launching the Setup, the
prerequisites will be checked to see whether the .NET Core packets have
been installed and which are needed to run the Deploy Server and the other
Runtime components. If these prerequisites are missing, the Setup
will download them from the Microsoft webisite and install them.
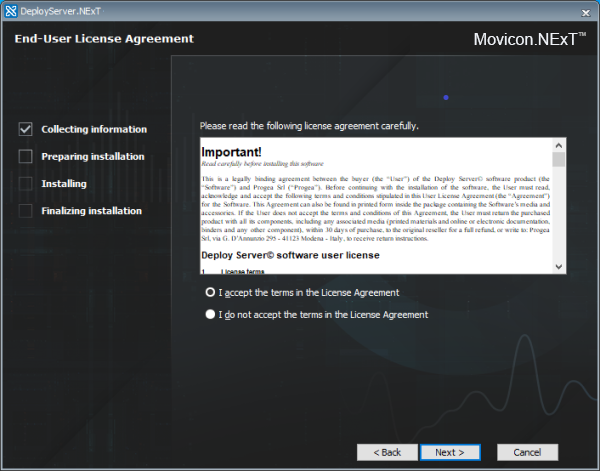
Once the prerequisites have been
met, it will be possible to proceed with installing the Deploy Server
by accepting the terms of the user license.
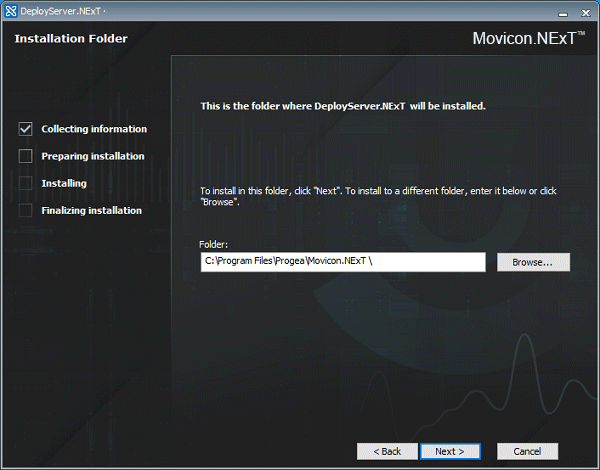
You will then be asked in which
path to install the Deploy Server.
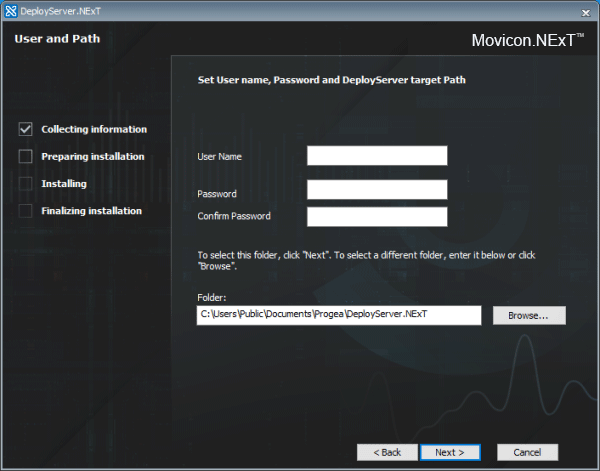
After this, it will possible
to set the user and password to be used to connect to the Deploy Server
(by means of the Deploy window) and the path in which the runtime components,
such as the I/O Data Server and WebHMI Service, are to be installed on
the device.

|
You
can skip the last step of the setup which asks for user credentials
and the target folder by launching the setup directly from the
following command line:
DeployServerNext.exe
DEPLOYUSERNAME={username} DEPLOYPASSWORD={password} DEPLOYPATH={absolute_path}
For example:
DeployServerNext.exe
DEPLOYUSERNAME=admin@company.com DEPLOYPASSWORD=Password123$ DEPLOYPATH=C:\WebHMI |
Installing
the Deploy Server on Linux device (ARM64)
In this section we will explain
how to install the Movicon.NExT Deploy Server on ARM64 operating systems.
First
download the script file.
sudo
wget https://support.movicon.com/download/Movicon_DeployServer/linux/arm64/deployServerInstaller
|
Install
the Deploy Server making the file executable:
sudo
chmod +x deployServerInstaller
|
Run
the file installer:
sudo
./deployServerInstaller
|
Start the Deploy Server manually
After having launched
the "deployServerInstaller" file, the "start.sh"
file will be created:
Use
this file to start the deploy server manually:
Start the Deploy Server start the Deploy Server
automatically
If you want
the Deploy server to start running when the operating system starts up,
you should:
Create the service file:
sudo
nano /etc/systemd/system/DeployServer.service
|
Check to see if any corrections
need to be made to the two ‘WorkingDirectory’ and ‘ExecStart’ folders
when those for default are not being used and copy/paste the following
code in the editor:
[Unit]
Description=Movicon NExT
DeployServer
[Service]
WorkingDirectory=/moviconData
ExecStart=dotnet /moviconData/start.sh
Restart=always
RestartSec=2
SyslogIdentifier=DeployServer
User=root
Environment=ASPNETCORE_ENVIRONMENT=Production
[Install]
WantedBy=multi-user.target
|
Save and exit from the
text editor.
Reload the system manager's
configuration:
sudo
systemctl daemon-reload
|
Enable the service you
have just created:
sudo
systemctl enable DeployServer.service
|
Start the service:
sudo
systemctl start DeployServer.service
|
Check the service's status:
sudo
systemctl status DeployServer.service
|
You can connect to the Deploy
server using the following credentials:
Username:
MoviconUser@emerson.com
Password:
MyPwd123!

|
The predefined passwords
are provisional and used only for the initial setup or demo mode.
Not changing these passwords will put security at serious risk! |

|
The username and password
used for accessing the deploy server can be changed directly in
the "deployServerInstaller" file downloaded in the "deployServer"
folder before running it. |
Installing the Deploy
Server on Linux (ARM32) devices
This section describes how to
install the Movicon.NExT Deploy Server on ARM64 operating systems.
First
download the script file.
sudo wget https://support.movicon.com/download/Movicon_DeployServer/linux/arm32/deployServerInstaller
|
Install
the Deploy Server to make the file executable:
sudo chmod +x deployServerInstaller
|
Run
the installer file:
sudo ./deployServerInstaller
|
Launching
the Deploy Server manually
Launch
the "deployServerInstaller" file to create the "start.sh"
file
Use
this file to start up the deploy server manually
Launching
the Deploy server automatically
If you wish
the Deploy Server to startup automatically when starting the operating
system, you should:
Create
the service file:
sudo nano /etc/systemd/system/DeployServer.service
|
Check
and eventually correct the two ‘WorkingDirectory’ and ‘ExecStart’
folders. If you don't have these folders, use the default one.
Then copy and paste the following code in the editor:
[Unit]
Description=Movicon NExT
DeployServer
[Service]
WorkingDirectory=/moviconData
ExecStart=dotnet /moviconData/start.sh
Restart=always
RestartSec=2
SyslogIdentifier=DeployServer
User=root
Environment=ASPNETCORE_ENVIRONMENT=Production
[Install]
WantedBy=multi-user.target
|
Save
and exist from the text editor.
Reload
the system manager's configuration:
sudo systemctl daemon-reload
|
Enable
the service just created:
sudo systemctl enable
DeployServer.service
|
Start
the service up:
sudo systemctl start DeployServer.service
|
Check
the status of the service:
sudo systemctl status
DeployServer.service
|
The following credentials can
be used to connect to the Deploy Server:
Username:
MoviconUser@emerson.com
Password:
MyPwd123!

|
This password is only
provisional and must be used only for the initial configuration
or when using demo mode. If you do not change this
password after using it for the first time, you may put system
security at risk! |

|
The username and password
used for accessing the deploy server can be changed directly in
the "deployServerInstaller" file which is downloaded
in the "deployServer" folder before running it. |
Installing
the Deploy Server on LinuxDocker devices
In this section we will explaing
how to install the Movicon.NExT Deploy Server on Ubuntu 22.04 operating
systems that use Docker technology.
Before going ahead with the installation
procedures, please make sure that the Docker Engine is installed on the
operating system. If this is not the case, the following paragraph
will explain how to install the Docker Engine using the repositories:
Repository setup
Update
the apt package index and install the packages that allow the apt
package manager to use a repository in the HTTPS protocol using the
Ubuntu "Terminal" window:
sudo
apt-get update
sudo
apt-get install ca-certificates curl gnupg lsb-release -y
|
Add
the Docker's GPG key:
sudo
mkdir -p /etc/apt/keyrings
curl
-fsSL https://download.docker.com/linux/ubuntu/gpg | sudo
gpg --dearmor -o /etc/apt/keyrings/docker.gpg
|
Use
the following command for the repository's setup:
echo
"deb [arch=$(dpkg --print-architecture) signed-by=/etc/apt/keyrings/docker.gpg]
https://download.docker.com/linux/ubuntu $(lsb_release -cs)
stable" | sudo tee /etc/apt/sources.list.d/docker.list
> /dev/null
|
Docker
Engine Installation
Update
the apt package index:
Install
the Docker Engine, Containerd and Docker Compose:
sudo
apt-get install docker-ce docker-ce-cli containerd.io docker-compose-plugin
-y
|
Check
to see if the Docker Engine installation terminated successfully by
running the "hello-world" image:
sudo
docker run hello-world
|
For further
info, please also see: https://docs.docker.com/engine/install/ubuntu/
Movicon
Deploy Server Installation
Download
the "dockerfile" by first creating a new empty folder and
call it "dockerFiles" and then select it:
sudo
mkdir dockerFiles
cd
dockerFiles
|
Download
the "dockerfile" within the new folder:
sudo
wget http://support.progea.com/download/Movicon_DeployServer/latest/dockerfile
|
Install
the Deploy Server, creating an image by means of using the dockerfile
instruction:
sudo
docker build -t webhmi .
|
At
this point, you will need to start up the Deploy Server Container,
publishing the TCP ports and making sure that it always runs after
a system restart:
sudo
docker run -d --name MoviconWebHMI -p 5000:5000 -p 5001:5001
-p 5002:5002 -p 62841:62841 --restart always webhmi
|
The connection to the Deploy
Server can be obtained by using the following credentials:
Username:
MoviconUser@emerson.com
Password:
MyPwd123!

|
The predefined passwords
are provisional by default and are only used for the initial configuration
or demo mode. System security will be put at risk if left
unchanged! |

|
The username and password
used can be changed to access the deploy server directly within
the "deployServerInstaller.run" downloaded within the
"deployServer" folder before running it. |
Installing
the Deploy Server on Ubuntu (Linux) 16.04 devices
In this section we will explain
how to install the Movicon.NExT Deploy Server on Ubuntu 16.04 LTS operating
systems.
First
download the script file.
sudo
wget https://support.movicon.com/download/Movicon_DeployServer/ubuntu/16.04/deployServerInstaller
|
Install
the Deploy Server making the file executable:
sudo
chmod +x deployServerInstaller
|
Run
the file installer:
sudo
./deployServerInstaller
|
Start the Deploy Server manually
After having launched
the "deployServerInstaller" file, the "start.sh"
file will be created:
Use
this file to start the deploy server manually:
Start the Deploy Server start the Deploy Server
automatically
If you want
the Deploy server to start running when the operating system starts up,
you should:
Create the service file:
sudo
nano /etc/systemd/system/DeployServer.service
|
Check to see if any corrections
need to be made to the two ‘WorkingDirectory’ and ‘ExecStart’ folders
when those for default are not being used and copy/paste the following
code in the editor:
[Unit]
Description=Movicon NExT
DeployServer
[Service]
WorkingDirectory=/moviconData
ExecStart=dotnet /moviconData/start.sh
Restart=always
RestartSec=2
SyslogIdentifier=DeployServer
User=root
Environment=ASPNETCORE_ENVIRONMENT=Production
[Install]
WantedBy=multi-user.target
|
Save and exit from the
text editor.
Reload
the system manager's configuration:
sudo
systemctl daemon-reload
|
Enable the service you
have just created:
sudo
systemctl enable DeployServer.service
|
Start the service:
sudo
systemctl start DeployServer.service
|
Check the service's status:
sudo
systemctl status DeployServer.service
|
You can connect to the Deploy
server using the following credentials:
Username:
MoviconUser@emerson.com
Password:
MyPwd123!

|
The predefined passwords
are provisional and used only for the initial setup or demo mode.
Not changing these passwords will put security at serious risk! |

|
The username and password
used for accessing the deploy server can be changed directly in
the "deployServerInstaller" file downloaded in the "deployServer"
folder before running it. |
Installing
the Deploy Server on Ubuntu (Linux) 18.04 devices
In this section we will explain
how to install the Movicon.NExT Deploy Server on Ubuntu 18.04 LTS operating
systems.
First
download this script file:
sudo
wget https://support.movicon.com/download/Movicon_DeployServer/ubuntu/18.04/deployServerInstaller
|
Install
the Deploy Server making the file executable:
sudo
chmod +x deployServerInstaller
|
Run
the file installer:
sudo
./deployServerInstaller
|
Start the Deploy Server manually
Launch the "deployServerInstaller"
file to create the "start.sh" file:
This
file can be used to start the Deploy Server manually:
Start the Deploy Server start the Deploy Server
automatically
If you want
the Deploy server to start running when starting up the operating system,
you should:
Create the service file:
sudo
nano /etc/systemd/system/DeployServer.service
|
Check to see if any corrections
need to be made to the two ‘WorkingDirectory’ and ‘ExecStart’ folders
when those for default are not being used and copy/paste the following
code in the editor:
[Unit]
Description=Movicon NExT
DeployServer
[Service]
WorkingDirectory=/moviconData
ExecStart=dotnet /moviconData/start.sh
Restart=always
RestartSec=2
SyslogIdentifier=DeployServer
User=root
Environment=ASPNETCORE_ENVIRONMENT=Production
[Install]
WantedBy=multi-user.target
|
Save and exit from the
text editor.
Reload
the system manager's configuration:
sudo
systemctl daemon-reload
|
Enable the service you
have just created:
sudo
systemctl enable DeployServer.service
|
Start the service:
sudo
systemctl start DeployServer.service
|
Check the service's status:
sudo
systemctl status DeployServer.service
|
You can connect to the Deploy
server using the following credentials:
Username:
MoviconUser@emerson.com
Password:
MyPwd123!

|
The predefined passwords
are provisional and used only for the initial setup or demo mode.
Not changing these passwords will put security at serious risk! |

|
The username and password
used for accessing the deploy server can be changed directly in
the "deployServerInstaller" file downloaded in the "deployServer"
folder before running it. |
Installing
the Deploy Server on Ubuntu (Linux) 20.04 devices
This section explains how to install the Movicon.NExT Deploy Server
on Ubuntu 20.04 LTS operating systems.
First
download this script file:
sudo
wget https://support.movicon.com/download/Movicon_DeployServer/ubuntu/20.04/deployServerInstaller
|
Install
the Deploy Server making the file executable:
sudo
chmod +x deployServerInstaller
|
Run
the file installer:
sudo
./deployServerInstaller
|
Start the Deploy Server manually
Launch the "deployServerInstaller"
file to create the "start.sh" file:
This
file can be used to start the Deploy Server manually:
Start the Deploy Server start the Deploy Server
automatically
If you want
the Deploy server to start running when starting up the operating system,
you should:
Create the service file:
sudo
nano /etc/systemd/system/DeployServer.service
|
Check to see if any corrections
need to be made to the two ‘WorkingDirectory’ and ‘ExecStart’ folders
when those for default are not being used and copy/paste the following
code in the editor:
[Unit]
Description=Movicon NExT
DeployServer
[Service]
WorkingDirectory=/moviconData
ExecStart=dotnet /moviconData/start.sh
Restart=always
RestartSec=2
SyslogIdentifier=DeployServer
User=root
Environment=ASPNETCORE_ENVIRONMENT=Production
[Install]
WantedBy=multi-user.target
|
Save and exit from the
text editor.
Reload
the system manager's configuration:
sudo
systemctl daemon-reload
|
Enable the service you
have just created:
sudo
systemctl enable DeployServer.service
|
Start the service:
sudo
systemctl start DeployServer.service
|
Check the service's status:
sudo
systemctl status DeployServer.service
|
You can connect to the Deploy
server using the following credentials:
Username:
MoviconUser@emerson.com
Password:
MyPwd123!

|
The predefined passwords
are provisional and used only for the initial setup or demo mode.
Not changing these passwords will put security at serious risk! |

|
The username and password
used for accessing the deploy server can be changed directly in
the "deployServerInstaller" file downloaded in the "deployServer"
folder before running it. |


